本文共 9741 字,大约阅读时间需要 32 分钟。
前面,我们通过在jenkins上创建一个free style job,然后跑起来我们的selenium自动化测试。现在开始,我们要把这种方式给丢弃,采用pipeline的方式,让更多手工配置操作,写入到代码中去。一开始,我们从简单做起,慢慢来。这篇文章的目标就是,创建并成功运行一个pipeline job,先不考虑灵活的变量,我们只考虑如何在pipeline代码中去执行run.bat文件,从而把selenium自动化测试给跑起来。
1.项目结构修改

为了支持pipeline,我做了两件事。第一件事情,把jenkins-core-xxx.jar包添加到当前项目的build path里。我本来在maven pom.xml文件写Jenkins core的依赖配置,但是发现报错,也许是我环境问题,暂时就采用这样本地依赖。因为在pipeline代码中,我们将来在发送邮件的时候需要用到jenkins环境的信息,所以需要导入这个jar包。
第二件事情就是,添加一个pipeline的文件夹,里面第一个文件selenium_jenkins.groovy是一个写多个stage的文件,第二个文件selenium.groovy是一个模块方法,我本来把java修改config.properties文件里面的属性值的方法写入到这里,遇到了一个错误,还没有解决。这篇不介绍这个文件和文件内容。
下面代码是selenium_jenkins.groovy的内容。
import hudson.model.*;pipeline{ agent any parameters { string(name: 'BROWSER_TYPE', defaultValue: 'chrome', description: 'Type a browser type, should be chrome/firefox') string(name: 'TEST_SERVER_URL', defaultValue: '', description: 'Type the test server url') string(name: 'NODE', defaultValue: 'win-anthony-demo', description: 'Please choose a windows node to execute this job.') } stages{ stage("Initialization"){ steps{ script{ browser = BROWSER_TYPE?.trim() test_url = TEST_SERVER_URL?.trim() win_node = NODE?.trim() } } } stage("Git Checkout"){ steps{ script{ node(win_node) { checkout([$class: 'GitSCM', branches: [[name: '*/master']], userRemoteConfigs: [[credentialsId: '6f4fa66c-eb02-46dc-a4b3-3a232be5ef6e', url: 'https://github.com/QAAutomationLearn/JavaAutomationFramework.git']]]) } } } } stage("Run Selenium Test"){ steps{ script{ node(win_node){ run_bat = env.WORKSPACE + "\\run.bat" bat (run_bat) } } } } }} 上面三个stage,第一个初始化这个暂时不介绍,后面文章我需要用到,就是把测试地址url和浏览器类型,是firefox还是chrom,这个我需要做参数化处理,这篇文章不涉及,可以不管,留着后面用。第二个stage是在windows的机器上拉取代码,因为你不能保证,这台windows机器上一定有你最新的github项目的代码。这里提醒一下,这个windows node,需要你自己配置,如何配置,参考我文章。这个机器需要安装groovy,java.maven等环境,并设置环境变量。第三个stage,是我们这篇重点实现过程。定义你run.bat在你windows机器哪个位置,需要交代清楚。第二行代码就是执行一个bat命令,这里复习下,如果执行linux shell命令,这个地方命令把bat改成sh就可以。
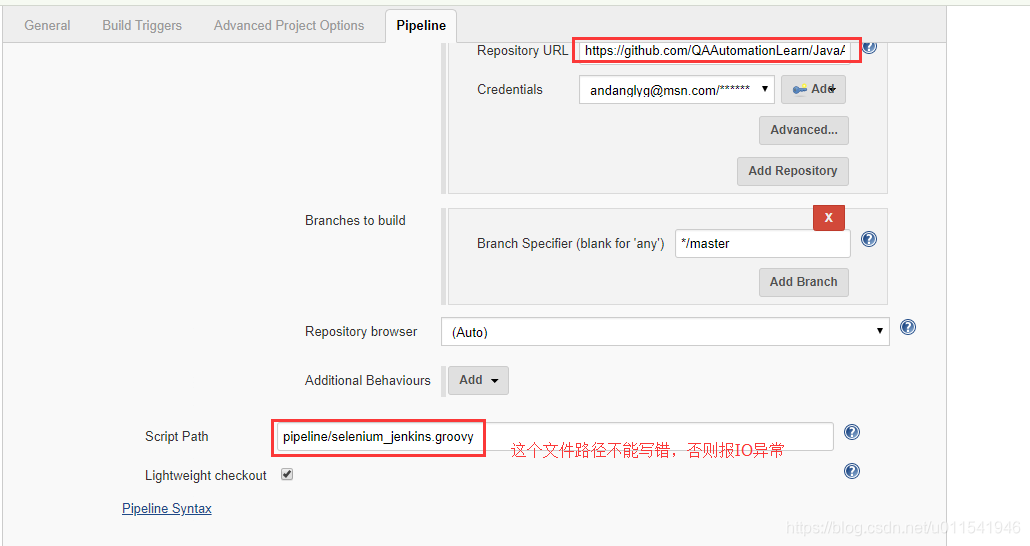
2.在jenkins上创建一个pipeline的job
我Jenkins环境有一个例子可以参考:
重点介绍下,git和pipeline入口文件设置
3.运行测试
应该来说,每个人都不可能一次就运行成功,需要根据你运行报错,调整代码,修复问题。这里我有一个成功运行的例子:
这里还是贴一下日志内容:
Started by user adminReplayed #14Running in Durability level: MAX_SURVIVABILITY[Pipeline] nodeRunning on Jenkins in /var/lib/jenkins/workspace/selenium-pipeline-demo[Pipeline] {[Pipeline] stage[Pipeline] { (Declarative: Checkout SCM)[Pipeline] checkout > git rev-parse --is-inside-work-tree # timeout=10Fetching changes from the remote Git repository > git config remote.origin.url https://github.com/QAAutomationLearn/JavaAutomationFramework.git # timeout=10Fetching upstream changes from https://github.com/QAAutomationLearn/JavaAutomationFramework.git > git --version # timeout=10using GIT_ASKPASS to set credentials > git fetch --tags --progress https://github.com/QAAutomationLearn/JavaAutomationFramework.git +refs/heads/*:refs/remotes/origin/* > git rev-parse refs/remotes/origin/master^{commit} # timeout=10 > git rev-parse refs/remotes/origin/origin/master^{commit} # timeout=10Checking out Revision 8469a08f0ef6aaab86b706c4459fd122d3787292 (refs/remotes/origin/master) > git config core.sparsecheckout # timeout=10 > git checkout -f 8469a08f0ef6aaab86b706c4459fd122d3787292Commit message: "remove $ on env.workspace" > git rev-list --no-walk 8469a08f0ef6aaab86b706c4459fd122d3787292 # timeout=10[Pipeline] }[Pipeline] // stage[Pipeline] withEnv[Pipeline] {[Pipeline] stage[Pipeline] { (Initialization)[Pipeline] script[Pipeline] {[Pipeline] }[Pipeline] // script[Pipeline] }[Pipeline] // stage[Pipeline] stage[Pipeline] { (Git Checkout)[Pipeline] script[Pipeline] {[Pipeline] nodeRunning on win-anthony-demo in C:\JenkinsNode\workspace\selenium-pipeline-demo[Pipeline] {[Pipeline] checkout > git rev-parse --is-inside-work-tree # timeout=10Fetching changes from the remote Git repository > git config remote.origin.url https://github.com/QAAutomationLearn/JavaAutomationFramework.git # timeout=10Fetching upstream changes from https://github.com/QAAutomationLearn/JavaAutomationFramework.git > git --version # timeout=10using GIT_ASKPASS to set credentials > git fetch --tags --progress https://github.com/QAAutomationLearn/JavaAutomationFramework.git +refs/heads/*:refs/remotes/origin/* > git rev-parse "refs/remotes/origin/master^{commit}" # timeout=10 > git rev-parse "refs/remotes/origin/origin/master^{commit}" # timeout=10Checking out Revision 8469a08f0ef6aaab86b706c4459fd122d3787292 (refs/remotes/origin/master) > git config core.sparsecheckout # timeout=10 > git checkout -f 8469a08f0ef6aaab86b706c4459fd122d3787292Commit message: "remove $ on env.workspace"[Pipeline] }[Pipeline] // node[Pipeline] }[Pipeline] // script[Pipeline] }[Pipeline] // stage[Pipeline] stage[Pipeline] { (Run Selenium Test)[Pipeline] script[Pipeline] {[Pipeline] nodeRunning on win-anthony-demo in C:\JenkinsNode\workspace\selenium-pipeline-demo[Pipeline] {[Pipeline] bat[selenium-pipeline-demo] Running batch scriptC:\JenkinsNode\workspace\selenium-pipeline-demo>C:\JenkinsNode\workspace\selenium-pipeline-demo\run.batC:\JenkinsNode\workspace\selenium-pipeline-demo>cd C:\Users\Anthont\git\AnthonyWebAutoDemo C:\Users\Anthont\git\AnthonyWebAutoDemo>mvn clean install [INFO] Scanning for projects...[WARNING] [WARNING] Some problems were encountered while building the effective model for AnthonyAutoV10:AnthonyAutoV10:jar:0.0.1-SNAPSHOT[WARNING] 'build.plugins.plugin.version' for org.apache.maven.plugins:maven-compiler-plugin is missing. @ line 19, column 15[WARNING] [WARNING] It is highly recommended to fix these problems because they threaten the stability of your build.[WARNING] [WARNING] For this reason, future Maven versions might no longer support building such malformed projects.[WARNING] [INFO] [INFO] -------------------< AnthonyAutoV10:AnthonyAutoV10 >--------------------[INFO] Building AnthonyAutoV10 0.0.1-SNAPSHOT[INFO] --------------------------------[ jar ]---------------------------------Downloading from central: https://repo.maven.apache.org/maven2/com/beust/jcommander/1.66/jcommander-1.66.pom[WARNING] The POM for com.beust:jcommander:jar:1.66 is missing, no dependency information available[INFO] [INFO] --- maven-clean-plugin:2.5:clean (default-clean) @ AnthonyAutoV10 ---[INFO] Deleting C:\Users\Anthont\git\AnthonyWebAutoDemo\target[INFO] [INFO] --- maven-resources-plugin:2.6:resources (default-resources) @ AnthonyAutoV10 ---[INFO] Using 'UTF-8' encoding to copy filtered resources.[INFO] skip non existing resourceDirectory C:\Users\Anthont\git\AnthonyWebAutoDemo\src\main\resources[INFO] [INFO] --- maven-compiler-plugin:3.1:compile (default-compile) @ AnthonyAutoV10 ---[INFO] Nothing to compile - all classes are up to date[INFO] [INFO] --- maven-resources-plugin:2.6:testResources (default-testResources) @ AnthonyAutoV10 ---[INFO] Using 'UTF-8' encoding to copy filtered resources.[INFO] skip non existing resourceDirectory C:\Users\Anthont\git\AnthonyWebAutoDemo\src\test\resources[INFO] [INFO] --- maven-compiler-plugin:3.1:testCompile (default-testCompile) @ AnthonyAutoV10 ---[INFO] Changes detected - recompiling the module![INFO] Compiling 11 source files to C:\Users\Anthont\git\AnthonyWebAutoDemo\target\test-classes[INFO] [INFO] --- maven-surefire-plugin:2.18.1:test (default-test) @ AnthonyAutoV10 ---[INFO] Surefire report directory: C:\Users\Anthont\git\AnthonyWebAutoDemo\target\surefire-reports------------------------------------------------------- T E S T S-------------------------------------------------------Running TestSuiteStarting ChromeDriver 2.40.565498 (ea082db3280dd6843ebfb08a625e3eb905c4f5ab) on port 29290Only local connections are allowed.Dec 23, 2018 5:26:20 PM org.openqa.selenium.remote.ProtocolHandshake createSessionINFO: Detected dialect: OSS INFO [main] (TC_NewCustomer_004.java:22)- Login is completed INFO [main] (TC_NewCustomer_004.java:28)- Proving customer details............. INFO [main] (TC_NewCustomer_004.java:46)- Validating adding new customer..............Tests run: 1, Failures: 0, Errors: 0, Skipped: 0, Time elapsed: 128.325 sec - in TestSuiteResults :Tests run: 1, Failures: 0, Errors: 0, Skipped: 0[INFO] [INFO] --- maven-jar-plugin:2.4:jar (default-jar) @ AnthonyAutoV10 ---[WARNING] JAR will be empty - no content was marked for inclusion![INFO] Building jar: C:\Users\Anthont\git\AnthonyWebAutoDemo\target\AnthonyAutoV10-0.0.1-SNAPSHOT.jar[INFO] [INFO] --- maven-install-plugin:2.4:install (default-install) @ AnthonyAutoV10 ---[INFO] Installing C:\Users\Anthont\git\AnthonyWebAutoDemo\target\AnthonyAutoV10-0.0.1-SNAPSHOT.jar to C:\Users\Anthont\.m2\repository\AnthonyAutoV10\AnthonyAutoV10\0.0.1-SNAPSHOT\AnthonyAutoV10-0.0.1-SNAPSHOT.jar[INFO] Installing C:\Users\Anthont\git\AnthonyWebAutoDemo\pom.xml to C:\Users\Anthont\.m2\repository\AnthonyAutoV10\AnthonyAutoV10\0.0.1-SNAPSHOT\AnthonyAutoV10-0.0.1-SNAPSHOT.pom[INFO] ------------------------------------------------------------------------[INFO] BUILD SUCCESS[INFO] ------------------------------------------------------------------------[INFO] Total time: 02:24 min[INFO] Finished at: 2018-12-23T17:28:20+08:00[INFO] ------------------------------------------------------------------------[Pipeline] }[Pipeline] // node[Pipeline] }[Pipeline] // script[Pipeline] }[Pipeline] // stage[Pipeline] }[Pipeline] // withEnv[Pipeline] }[Pipeline] // node[Pipeline] End of PipelineFinished: SUCCESS 这篇就介绍到这个,这个是pipeline方式运行selenium自动化的基础,后面我们根据需求,慢慢来优化和增加新代码。
转载地址:http://zzows.baihongyu.com/